
Building My First Xpenology NAS - 1
This post was translated from Chinese by AI. If anything reads oddly, the Chinese original is authoritative. 中文原文
After starting my company, I was short on equipment. My wife's family had a computer that was about six or seven years old, so I dug it out of the dust and brought it to the office. I initially wanted to see if it could serve as an office PC, but its specs were far too low, and it often wouldn't even boot, so it ended up sitting in a corner.
I'd always had a basic understanding of NAS. Around the middle of the year, I came across Xpenology on Douyin and got interested. After looking up a few tutorials, I thought I might be able to put this old hardware to use, so I found the computer and opened it up to check its specs.
This computer has a Celeron G550 + Onda H61 motherboard
G550 details: https://wap.zol.com.cn/339/338275/param.html
Motherboard details: https://detail.zol.com.cn/350/349481/param.shtml
The motherboard has a 100 Mbps Ethernet adapter, an onboard Realtek RTL8105E 100 Mbps Ethernet adapter. Even the port was loose and frequently lost contact. That led to my first pitfall, which I'll cover below.
The main tutorials I used:
- Creating a USB bootloader: https://www.pc-daily.com/xitong/72601.html
- Common errors: https://www.bilibili.com/read/cv14673271/
- Installation guide: https://zhuanlan.zhihu.com/p/515187738
Recommended version: DS3617 XS 6.17
For my initial installation, I used a 500G mechanical hard drive. The computer originally had an HD5450 graphics card, which I removed—the integrated graphics were enough.
Step 1: Follow the USB bootloader tutorial to create a bootable USB drive
There's not much to explain here; just follow the tutorial linked above. Make sure you change the VID and PID. I wasn't interested in making my setup appear to be a genuine Synology device, so I didn't look into changing the MAC address or anything like that. I'd also recommend against partial or full spoofing of a genuine device. It doesn't seem necessary and can cause a lot of instability. For a self-built Xpenology setup, reliable operation is enough.
Resource link: https://pan.gxnas.com:1443/
This contributor shares matching bootloaders and system images for both DS3617 and DS918, covering versions from 6.1 to 7.1. Just download the matching files;Make sure you wipe the hard drive. Don't partition it; leave it blank;
Step 2: Insert the bootable USB drive and power on
At this point, connect the computer to a monitor and keyboard. A mouse is optional, since you need to change the boot order in the BIOS;
If everything goes well, the monitor will show:
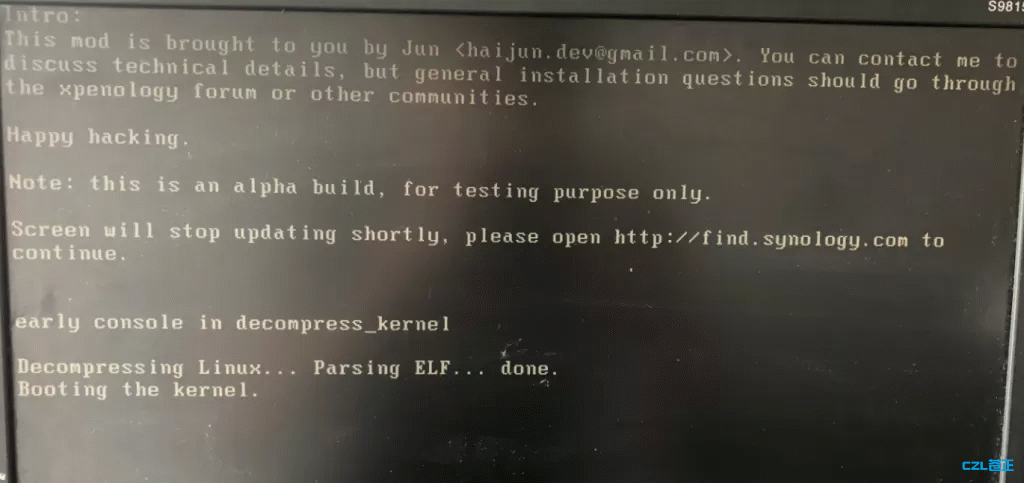
Don't open find.synology.com at this point, as it often fails to find the device. Download “Synology Assistant” from the official website instead. Versions are available for both windows and mac;
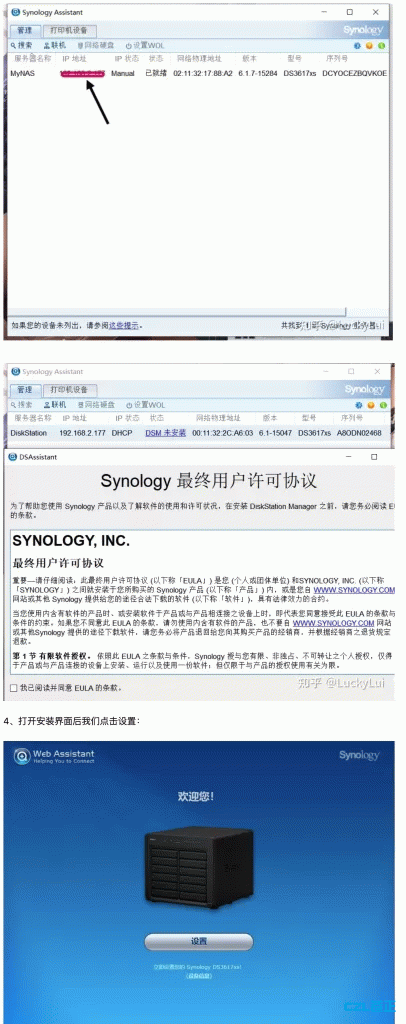
If everything looks good, continue with the installation;
Possible issues:
- The computer can't be found: first open your router's admin page and check for a device named “DiskStation”. If it's there, try searching a few more times;
- If the device isn't listed on the router's page, check whether the Ethernet port's lights are on. I didn't know to check this at first and tried several system images, only to discover that the cable wasn't making good contact with the old Ethernet port. Pushing it in a little fixed it;
- If both the router and the Ethernet port lights look fine, congratulations—your Ethernet adapter may be unsupported. Here's the list of adapters supported by version 6.1 that I found:
{callout color="#f0ad4e"}
Xpenology DSM 6.1 supported Ethernet adapters
Network Drivers
AMD
amd8111e : AMD 8111 (new PCI LANCE)
pcnet32 : AMD PCnet32 PCI
Asix
asix : ASIX AX88xxx Based USB 2.0 Ethernet Adapters
ax88179_178a : ASIX AX88179/178A USB 3.0/2.0 to Gigabit Ethernet
Atheros / Qualcomm
atl1 : Atheros/Attansic L1 Gigabit Ethernet
atl1c : Atheros L1C Gigabit Ethernet
atl1e : Atheros L1E Gigabit Ethernet
atl2 : Atheros L2 Fast Ethernet
alx : Qualcomm Atheros AR816x/AR817x
Broadcom
b44 : Broadcom 440x/47xx
bnx2 : Broadcom NetXtremeII BCM5706/BCM5708/5709/5716
bnx2x : Broadcom NetXtremeII 10Gb BCM57710/BCM57711/BCM57711E/BCM57712
tg3 : Broadcom Tigon3 BCM5705/BCM5703/BCM5702/BCM5701/BCM5700/BCM5721/BCM5751/BCM5788/BCM5704/BCM5752/BCM5789
tg3 : BCM5723/BCM5761/BCM5787/BCM5755/BCM5722/BCM5754/BCM57781/BCM57785/BCM5718BCM57765/BCM57761
tg3 : BCM5719/BCM5725/BCM5762/BCM5720/BCM57790/BCM57795/BCM57766/BCM57780
Chelsio
cxgb : Chelsio 10Gb Ethernet
cxgb3 : Chelsio Communications T3 10Gb
cxgb4 : Chelsio Communications T4 Ethernet
Cisco
enic : Cisco VIC Ethernet NIC
D-Link
dl2k : D-Link DL2000-based Gigabit Ethernet Adapter
HP
hp100 : HP 10/100VG PCLAN (ISA, EISA, PCI)
Intel
e100 : Intel PRO/100+
e1000 : Intel PRO/1000 CT/F/GT/MF/MT/T/XF/XT 82543GC/82546EB/82545EM/82540EM/82540EP/82544GC/82544EI/82547EI/82541EI
e1000 : 82545GM/82546GB/82541ER/82547GI/82541GI/82541PI/82566MM/82566MC/82566DM/82566DC/82563EB/82564EB/82562
e1000e : 82573L/82572EI/82571EB/82573E/82573V/82567/82574L/82566MM/82566MC
e1000e : 82566DM/82566DC/82563EB/82574IT/82583V/82579LM/82579V/82577LC/82577LM
e1000e : 82578DC/82578DM/Gigabit CT Desktop Adapter/PRO/1000 PT/PF/I217-LM/V/I218-V/LM/I219 LM/V
igb : 82576EB/82576NS/82580EB/82575EB/Gigabit ET/ET2/EF/VT
igb : I350-AM4/I350-BT2/I350-AM2/I350-T2/I350-T4/I350-F2/I350-F4
igb : I340-F4I340-T4/I210-AT/I210-IS/I210-IT/I210-T1/I210-AS/I210-CS
ixgbe : Intel 10 Gigabit AF DA/AT/AT2/CX4/XF LR/XR/82599EB/82598EB/82599ES/82599EN
ixgbe : X540-T1/X540-T2/540-AT2/X520-SR1/X520-SR2/X520-DA2/X520-LR1/X520-DA1/X520-DA4/X520-QDA1/X520-T2 X550-BT2/AT/AT2 X550-T1/T2
i40e : Intel 40 Gigabit X710-AM2/XL710-AM1/XL710-AM2/X710-DA2/X710-DA4/XL710-QDA1/XL710-QDA2
JMicron
jme : JMicron(R) PCI-Express Gigabit
Marvell
skge : Marvell Yukon Gigabit Ethernet
sky2 : Marvell Yukon 2 88E8021/88E8022/88E8035/88E8036/88E8038/88E8050/88E8052/88E8053/88E8055/88E8061/88E8062, SysKonnect SK-9E21D/SK-9S21
Mellanox
mlx4_en : Mellanox Technologies 10Gbit Ethernet
NVIDIA
forcedeth : nForce Ethernet
Brocade/QLogic
bna : Brocade 1010/1020 10Gb Ethernet
qla3xxx : QLogic QLA3XXX Network Driver
qlcnic : QLOGIC QLCNIC 1/10Gb Converged Ethernet
qlge : QLogic QLGE 10Gb Ethernet
pegasus : Pegasus/Pegasus II USB Ethernet driver
pch_gbe : EG20T PCH Gigabit ethernet Driver
Realtek
r8101 : RTL8100E/RTL8101E/RTL8102E-GR/RTL8103E(L) RTL8102E(L)/RTL8101E/RTL8103T RTL8401/RTL8401P/RTL8105E RTL8402/RTL8106E/RTL8106EUS
r8168 : RTL8111B/RTL8168B/RTL8111/RTL8168 RTL8111C/RTL8111CP/RTL8111D(L) RTL8168C/RTL8111DP/RTL8111E
r8168 : RTL8168E/RTL8111F/RTL8411 RTL8111G/RTL8111GUS/RTL8411B(N) RTL8118AS
r8169 : RTL8110SC(L) RTL8110S/RTL8110SB(L)/RTL8169SB(L)/RTL8169S(L)/RTL8169
r8150 : USB RTL8150 based Ethernet device
r8152 : RTL8152/RTL8153 Based USB 2.0/3.0 Ethernet Adapters
rtl8150 : USB RTL8150 Based USB Ethernet Adapter
SiS
sis900 : SiS 900/7016
sis190 : SiS190/SiS191
VIA
via-rhine : VIA Rhine
via-velocity : VIA Velocity
Virtio
virtio_net : Virtio network driver
VMware
vmxnet3 : VMware VMXNET3 ethernet driver
sc92031 : Silan SC92031 PCI Fast Ethernet Adapter driver
==================== End
{/callout}
I couldn't find a list for version 6.2. If you have lists of supported network cards for versions 6.2 and 7.1, please let me know in the comments or by email. Thanks.
Version 6.1 probably has the broadest network card support. If your computer isn't supported even by version 6.1, there's another option: buy a supported network card and plug it into a PCIE slot. I recommend the one I used for a later upgrade: Realtek RTL8111F Gigabit network card. It's cheap at 18 yuan and delivers stable Gigabit speeds. Gigabit is enough for my needs right now, so I don't need 2.5G yet. Besides, 2.5G would also require a 2.5G switch and router, adding to the cost.
Step Three: Installation and Usage
Just follow the tutorials I linked above, but keep one thing in mind:
If you're also installing DS3617, you need to enable SHR before creating a storage pool.
Otherwise, you can only create RAID and basic arrays. Personally, I find SHR quite useful.
How to enable it:
SHR is unavailable by default on DS3615/3617, but you can enable it on 3615 and 3617 too. Log in via SSH as root and edit /etc.defaults/synoinfo.conf. Find supportraidgroup="yes", add # at the start of that line or delete it, and add a line containing: support_syno_hybrid_ra. Press ESC, enter :wq to save and exit, then restart the NAS for the change to take effect.
I haven't written much here, since experienced users have already shared most of the tutorials online. The links I posted should cover what you need for a successful installation. In the second post, I'll share the upgrades and configuration I did myself.
Last updated 2025-06-25
Comments 0